Mayfield Creamery Ice Cream Party


Mayfield Ice Cream is a Southern classic– ever since I moved to Georgia in 2006, that iconic yellow carton is everywhere!  I was so excited to partner with Mayfield to showcase the relaunch of the brand, returning to its original name from 94 years ago : Mayfield Creamery.  I couldn’t think of a better way to celebrate, than with a DIY ice cream party with my favorite neighborhood kiddos!

Originally founded as Mayfield Creamery, the company believes returning to the “Mayfield Creamery” brand name bests represents the values and traditions of the brand, and their time-honored commitment to making the finest quality ice cream, that can only come from a real dairy.

Although Mayfield Creamery ice cream has rebranded and refreshed its packaging, customers can still expect the same great taste that families have grown to love and trust since 1923. The new Mayfield Creamery logo has been adapted from the classic circular Mayfield Dairy Farms logo, recognized by generations of families across the Southeast. The packaging now features a delivery truck set against the foothills of the Smoky Mountains, representing the brand’s origin as a milk company and their southern roots.  

Over the years, Mayfield has offered signature and classic ice cream flavors that their fans crave and developed exciting new recipes inspired by southern dessert traditions, each crafted to ensure the same homemade taste that’s delighted families since their very first batch in 1923.

New flavors this year include Lemon Ice Box Pie, Summer Berry Swirl, Sea Salt Caramel Cheesecake and Candy Jar Crunch. 

Mayfield is offering an array of limited edition flavors this year, such as Cherry Chocolate Chip and Banana Pudding, as well as seasonal favorites Pumpkin Pie and Peppermint Stick.  

Mayfield Creamery ice creams, with the same rich taste and traditions families have grown to trust, can be found in stores across the Southeast including Walmart, Kroger, Publix, Harris-Teeter, Bi-lo, Lowes, Ingles, Winn-Dixie, Food City and Target stores (Suggested Retail Price: $5.99).  

*This post is sponsored by Mayfield Creamery, but all opinions are my own.  

Like this post? Share it!
Share on FacebookTweet about this on TwitterPin on PinterestShare on Google+Email this to someone

Mayfield Creamery Delish and the Atlanta Braves

When I first moved to Atlanta in 2006, I was introduced to the Braves, and soon found out their history as America’s Baseball Team.  In the 70’s, Ted Turner decided to broadcast the Braves games on TBS. Back then, there weren’t any options like Netflix or Hulu, so lots of people around the country tuned in to the games.  They became an American favorite, and thus dubbed, “America’s Team.”  

America is still rooting for them, and now another “national past time” (Hello, ice cream!) is linked with the baseball favorite:  Mayfield Creamery.  Mayfield’s ice cream and frozen novelties will be sold at six standalone Mayfield Creamery Kiosks and throughout SunTrust Park.

Fans can enjoy a wide variety of Mayfield flavors, such as Signature Vanilla and Cookies and Cream as well as a rotation of flavors of the month.  And bonus, Mayfield is celebrating the Braves move to their new home by offering special promotions and ticket giveaways for Braves’ fans to experience the excitement up close and personal.  

Speaking of up close and personal, check out the view from the VIP suite I got to enjoy with family and friends, compliments of the Mayfield team!  Way to make a girl feel like #kindofabigdeal!  

The view from my VIP suite at SunTrust Park!

I had the pleasure of partnering with Mayfield Creamery to produce two television segments to promote their rebranding this summer.  Here’s the first piece!    

This is a sponsored post, but all opinions are my own.


Like this post? Share it!
Share on FacebookTweet about this on TwitterPin on PinterestShare on Google+Email this to someone

Capirotada and Stuffed Poblanos from Real California Milk

Hispanic dairy products can really transform ordinary meals into a new cultural food experience– adding a ton of flavor.  Cotija cheese is like Mexican feta– it’s an amazing salad topper.  Oaxaca is mellow and buttery and could replace traditional mozzarella on pizza.  Queso fresco can be folded into omelets or even in a grilled cheese sandwich. These cheeses are so versatile, you can use all of them in both savory and sweet dishes.

Hispanic dairy is the star of classic lent dishes like corn and cheese stuffed poblanos and capirotada, which is like Mexican bread pudding.  In the poblanos, fold a cup of Real California Asadero cheese, as well as oaxaca for maximum melty delish!  The cotija is the finishing cheese!  The combination of hispanic dairy packs major flavor and tastes so authentically Mexican.

Check out the corn and cheese stuffed poblano recipe on Real California Milk’s website.

Now let’s talk dessert.  The capirotada’s bread has soaked in all of that creamy, yummy dairy.  The combination of cotija and oaxaca cheeses layered into the bread pudding totally takes it over the top!

What I love about these recipes is that they look and feel fancy, but they’re so easy to make.  All of the ingredients are easy to find at local supermarkets in the dairy section– and they’re affordable too.  Just look for the Real California Milk seal on dairy products, made with milk from California’s 1300 hard working dairy farm families.  

Click here for the Capirotada recipe.

Check out the live segment below with these recipes on Great Day Houston

*This post was sponsored by Real California Milk.

Like this post? Share it!
Share on FacebookTweet about this on TwitterPin on PinterestShare on Google+Email this to someone
Peanut Butter bites

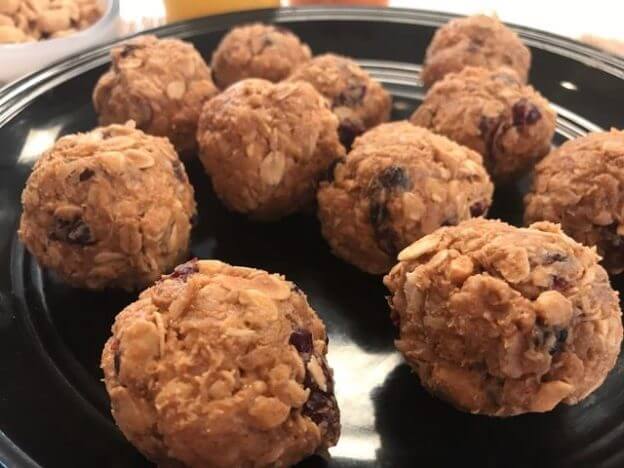
Peanut Butter and Cranberry Energy Bites

I like to consider EVERY MONTH National Peanut Month, but to celebrate Georgia’s most famous legume, I partnered with the Georgia Peanut Commission to do my favorite thing:  Make scrumptious recipe videos and, well, taste test.  Just give me a jar of peanut butter and I’m a happy girl– it’s what I consider breakfast most days!

Eating a nutritious breakfast packed with peanut powered protein really sets the tone for the day and can even help with weight loss by keeping your blood sugar stable and fueling your metabolism.  This super easy breakfast idea will keep you fuller longer– plus they can be prepped ahead of time — and they taste amazing!  Hello, Peanut Butter Cranberry Energy Bites!

These are no bake, no hassle, prep ahead delish!  And, you can feel even better about your peanut inspired breakfast because it’s loaded with protein and potassium which lowers your risk of blood pressure and heart disease. For more great recipes and information, check out the Georgia Peanut Commission’s website.  Click the video below for the yummy recipe!


*This post was sponsored by the Georgia Peanut Commission

Peanut Butter Cranberry Energy Bites
Perfect energy bite for breakfast, snack or on-the-go!
Write a review
Print
Ingredients
  1. 1 cup old fashioned oats
  2. 1/2 cup peanuts roughly chopped
  3. 1/3 shredded unsweetened coconut
  4. 1/3 dried cranberries (or dried fruit of your choice)
  5. 1/4 teaspoon ground cinnamon
  6. 3/4 cup peanut butter
  7. 1/4 honey
Instructions
  1. In a large mixing bowl mix together the dry ingredients: oat, peanuts, coconut, cranberries, and cinnamon.
  2. Add the peanut butter and honey and fold the ingredients together.
  3. Put wax paper on a baking sheet.
  4. Using a cookie scoop or Tablespoon shape each energy bite and roll with your hands and place on the baking sheet.
  5. Refrigerate the energy bites for a couple hours to help them harden.
What's on Parker's Plate? http://whatsonparkersplate.flywheelsites.com/
Like this post? Share it!
Share on FacebookTweet about this on TwitterPin on PinterestShare on Google+Email this to someone
USA Empanada

Summer Olympic Beef Empanadas

Beef Empanadas

Ever since I spent a semester abroad in Salamanca, Spain, empanadas have been one of my all-time favorite foods.  I remember waiting in line at a local panaderia, taking in the smell of fresh pastry and the savory morsels of delish inside the perfectly sealed crust.  

In the spirit of the Summer Olympics kicking off tomorrow night, these are the perfect party appetizer to serve because you can decorate the pastry with Team USA and stars using a simple cookie cutter.  It’s a great way to get the kiddos involved and make it a DIY baking activity!  

USA Empanada

Star_empanadas

Adding in the hint of saffron with the combo of olives and raisins makes this a more traditional Brazilian flavored bite, a nod to Rio, host to this year’s Summer Olympic games.  Serving small portions like this encourages moderation, too!  3oz of lean beef only has about 160 calories.  

Beef is one of my favorite proteins to entertain with because it’s so versatile.  I partnered with the California Beef Council to create this recipe, and had the honor of meeting their staff and getting the know more about the beef industry in the Golden State!  Beef is the 4th largest commodity in California — and cattle ranchers there are often 4th and 5th generation farmers. One interesting fact is that these hard working ranchers also happen to be stewards of the land, since so many endangered species make their homes on the gorgeous, expansive farms throughout the state.

Golden state, golden empanadas, gold medals — and gold standard of taste.  Pretty much a win for TEAM USA!

*This post was sponsored by the California Beef Council, but all opinions are my own.

Beef Empanadas
Brazilian style empanadas filled with savory beef
Write a review
Print
Ingredients
  1. 2 Tb canola oil
  2. 1/2 sweet onion diced
  3. 2 cloves of garlic minced
  4. 1.5 pounds ground beef
  5. kosher salt to taste
  6. 3 Tb tomato paste
  7. 2 Tb chopped cilantro
  8. 1 Tb hot pepper jelly
  9. 1/4 cup chopped green olives
  10. 2 Tb golden raisins
  11. 1 Tb smoked paprika
  12. 1 tsp cumin
  13. 1 Tb garlic powder
  14. 1 tsp saffron
  15. egg wash
  16. 1 box puff pastry (thawed)
Instructions
  1. Preheat oven to 400.
  2. Saute ground beef in canola oil until meat is cooked through. Drain.
  3. Return to stove top and add onion, fresh garlic, smoked paprika, cumin, saffron and garlic powder. Saute until fragrant and onion is soft, about 7 minutes on medium heat.
  4. Add tomato paste (stir to combine into beef mixture), cilantro, pepper jelly, olives, raisins and kosher salt to taste.
  5. Lay out puff pastry on a cutting board and using a mug or biscuit cutter, punch out a small circle shaped pastry. Put a couple spoonfuls of meat in the center and fold in half, sealing the edges by pressing down with the tines of a fork.
  6. Prick the empanada with the fork in a couple spots.
  7. Using cookie cutters, make pastry stars or letters to decorate the empanadas.
  8. Brush with egg wash, then add the cut outs to each empanada. Brush again with egg wash.
  9. Bake for 15-20 minutes until golden brown.
What's on Parker's Plate? http://whatsonparkersplate.flywheelsites.com/
Like this post? Share it!
Share on FacebookTweet about this on TwitterPin on PinterestShare on Google+Email this to someone
Roast Beef Appetizer

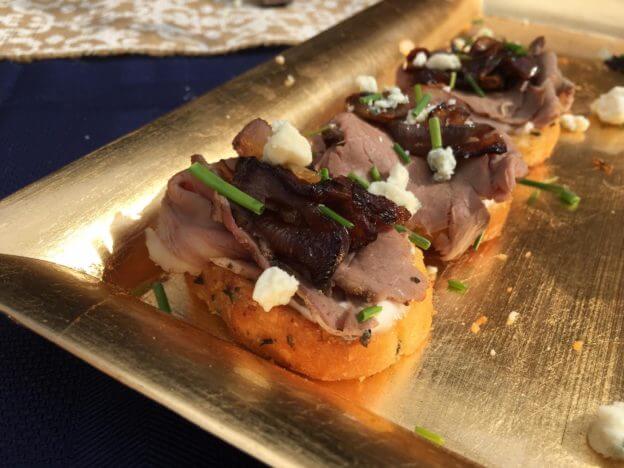
Roast Beef Crostinis with Horseradish Cream

Roast Beef Appetizer

Roast Beef crostinis with horseradish cream and caramelized onions are one of my all-time favorite appetizers!  It’s also an hors d’oeuvre you can serve during any season because it’s got the rich, earthy elements that are suited to fall and winter with the pop of flavor and freshness that are prefect for spring and summer entertaining.  

I’m obsessed with texture and mouth feel — I want crunchy, I want savory, I want sweet and I want smooth with some major wow factor.  Basically, I want layers of flavor that make you throw your head back and go, “OMGOMGOMGOMG!” These definitely deliver.

I partnered with the California Beef Council on a tour through California markets and had the delicious excuse to showcase these yummy crostinis.  California is one of the top producers of beef in the entire country!  The expansive farmland owned and operated by cattle ranchers is not only beautiful to look at, it’s also home to a number of endangered species, so these ranchers are truly stewards of the land.  

Beef is such a versatile protein– it can take on the flavor of whatever you mix with it.  One of my favorite combinations is adding that kick of horseradish to the roast beef.  Then, the caramelized onions really take it to the next level with a smooth, sweet finish!

Plus, you can feel good about knowing that there are only about 160 calories in 3 oz of beef– and with over 35 lean cuts of beef to choose from, you can get super creative!  Check out the link to my segment featuring the crostinis on San Diego Living.

Roast_Beef_Crostinis

Roast Beef Crostinis with Horseradish Cream
Savory bites with roast beef, horseradish cream and caramelized onions
Write a review
Print
For the crostinis
  1. French baguette, sliced and toasted with butter and a sprinkle of garlic powder
  2. 1/2 pound of roast beef
  3. Gorgonzola cheese
  4. Chopped chives for garnish
For the Horseradish Cream
  1. 3/4 cup full fat mayo
  2. 1-2 Tb prepared horseradish
  3. 1 Tb sour cream
  4. 1 Tb fresh lemon juice
  5. Dash of worcestershire sauce
  6. pinch of kosher salt to taste
For the caramelized onions
  1. 1 red onion sliced into thin rings
  2. 2 Tb butter
  3. 1/4 cup red wine
Instructions
  1. Preheat oven to 350.
  2. Brush melted butter on sliced baguette and sprinkle with garlic powder. Toast crostinis for 20-30 minutes, flipping over after 15 minutes.
For the horseradish cream
  1. Mix mayo, lemon, horseradish, worcestershire and a pinch of kosher salt.
For the onions
  1. Saute onion rings in butter on low/medium heat for 30 minutes, stirring occasionally. Add red wine and crank up heat to cook off wine and then reduce to low, stirring for another 15 minutes until caramelized.
To assemble
  1. Spread horseradish cream on the toasted crostinis.
  2. Top with roast beef, then caramelized onions and sprinkle with gorgonzola and chopped chives.
What's on Parker's Plate? http://whatsonparkersplate.flywheelsites.com/
*This post and segment were sponsored by The California Beef Council, but all opinions are my own.

Like this post? Share it!
Share on FacebookTweet about this on TwitterPin on PinterestShare on Google+Email this to someone
balsamic pork chop

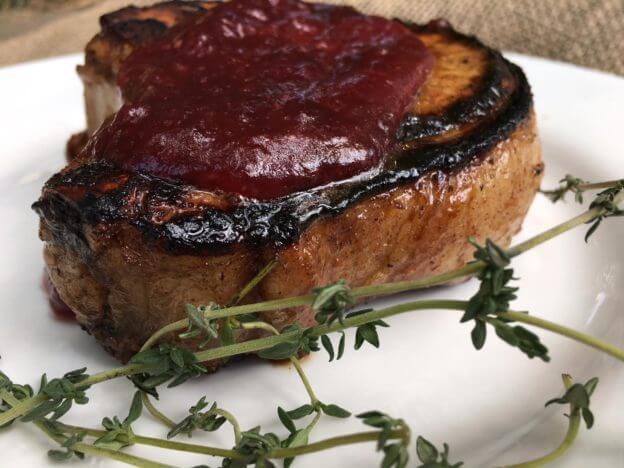
Balsamic Pork Chop with Cranberry Horseradish Sauce and Shaved Green Mango Salad

balsamic pork chop with cranberry sauce

When cranberries come to mind, most people think of a Thanksgiving dinner table with all the lush fixings.  But even though this healthy, antioxidant rich super fruit is harvested in the fall, it’s the perfect ingredient to take your summer entertaining to the next level.

fresh cranberries

Cranberries are extremely versatile and are the perfect addition to sweet or savory summer recipes including cocktails, smoothies, salads, desserts and this…..Does that pork chop right there make you want to lick your screen?  I thought so!  This cranberry horseradish sauce only has 4 ingredients, but the layers of flavor are so nuanced and balanced, you’d think it was super complicated.

balsamic pork chop

One of the things I love about cranberries is that they come in so many forms (fresh, frozen, canned, sauced, dried, etc…) that you can get really creative.  This recipe uses the jellied cranberry sauce variety and when you warm it up on the stove, it melts down into a beautiful “saucy” consistency.  Adding the savory balsamic marinated pork chop and you’ve got a winner-winner cranberry pork dinner!  This cranberry horseradish sauce would also work beautifully on a pork tenderloin.

balsamic cranberry pork chop

Balsamic Pork Chop with Cranberry Horseradish Sauce
A savory summer dish with a tender, balsamic marinated pork chop and a cranberry horseradish sauce
Write a review
Print
For the balsamic marinade
  1. 1/2 cup balsamic vinegar
  2. 1/3 cup olive oil
  3. 2 garlic cloves smashed
  4. 2 Tb honey
  5. 2 thick center cut pork chops
  6. 1 Tb olive oil and 1 Tb butter (to saute pork chops)
  7. kosher salt
For the sauce
  1. 1 can jellied cranberry sauce
  2. 2 Tb fresh garlic chopped
  3. 1 Tb olive oil
  4. 2 Tb horseradish
  5. 1-2 Tb brown sugar (depending on how much sweet you want to add)
  6. fresh thyme for garnish
Instructions
  1. Preheat oven to 375.
  2. Combine marinade ingredients well and marinate pork chops for 30 minutes.
  3. After 30 minutes take pork chops out of marinade and dry off on both sides with paper towel.
  4. Sprinkle chops with kosher salt.
  5. Heat up the 1 Tb olive oil and 1 Tb butter on a cast iron skillet or heavy duty non-stick skillet on medium heat.
  6. When butter is bubbling, add chops to skillet and cook for about 5 minutes on each side, being careful not to move chops around. Let them sit in place in pan to caramelize.
  7. Put chops in preheated oven for 10-12 minutes until cooked through.
  8. Let chops sit out while you make the sauce.
For the sauce
  1. Saute garlic until fragrant, about 3 minutes in a medium sauce pan.
  2. Add jellied cranberry and stir on medium heat until it melts down to a sauce-like consistency.
  3. Add horseradish and sugar and stir to combine.
  4. Pour sauce over pork chops when serving and garnish with fresh thyme
Notes
  1. You can use a pork tenderloin or pork roast with this sauce and it works beautifully.
What's on Parker's Plate? http://whatsonparkersplate.flywheelsites.com/
You can feel even better about this dinner because a new survey reveals cranberry eaters are healthy, active and adventurous!  

Lobster Mango and Cranberry Salad

Speaking of healthy, a friend of mine recently introduced me to green mangos which are basically unripe mangos.  If you shave them with a peeler, they are a scrumptious not-too-sweet but perfectly tangy base to a salad.  I added dried cranberries, almonds and avocado to this salad and fresh Maine lobster with a sweet buttermilk dressing that is creamy and refreshing.  The cranberries give the salad a gorgeous pop of color and flavor, while the almonds lend the perfect textured crunch in every bite.  And well, lobster is pretty much my favorite kind of seafood, so it adds a decadence all on its own!

mango cranberry salad with lobster

table set with lobster green mango salad

Shaved Green Mango and Cranberry Salad with Fresh Lobster
A refreshing summer salad studded with cranberries and fresh lobster
Write a review
Print
For the salad
  1. 1 pound fresh Maine Lobster
  2. 1 green mango shaved with a vegetable peeler
  3. 1 cup dried cranberries
  4. 1/4 cup almond slices
  5. 1 ripe avocado diced
  6. chives for garnish
For the dressing
  1. 1/2 cup buttermilk
  2. 2 Tb sour cream
  3. 1/8 cup sugar
  4. 1 Tb fresh lemon juice
  5. pinch of kosher salt
  6. sprinkle of black pepper
  7. 2 Tb fresh chopped chives
Instructions
  1. Top shaved green mango with fresh lobster, avocado, dried cranberries and almonds.
  2. Whisk dressing ingredients together and fold onto salad.
What's on Parker's Plate? http://whatsonparkersplate.flywheelsites.com/
All of this cranberry talk transports me back to the bogs of Cape Cod!  2 years ago, I had the opportunity to learn how cranberries are harvested when I visited the Rhodes family from Cape Cod Select.  It was so cool to put on those waders and immerse myself in a sea of cranberries!

Parker in the cranberry bog

80% of the U.S. population enjoy cranberries, according to a new survey commissioned by the Cranberry Marketing Committee. It turns out, eating cranberries—which ranked in the top three most popular berries—might have more benefits than many may realize. The nationwide survey found that in general, more cranberry eaters than non-cranberry eaters say they work out and are health-conscious, and are more likely to describe themselves as positive, and feel less stressed and more adventurous.  So, make this delish cranberry studded dinner and then plan your next adventure!

Check out some of my other cranberry recipes here:

Cranberry Dream Martini

Cranberry Bacon Jam

Cranberry Salsa

No Bake Cranberry Grand Marnier Cheesecake (Low-carb)

You can also check out uscranberries.com for recipes.

*This post was sponsored by the Cranberry Marketing Committee but all opinions are my own.


Like this post? Share it!
Share on FacebookTweet about this on TwitterPin on PinterestShare on Google+Email this to someone
Chipotle Gouda Stuffed Chicken

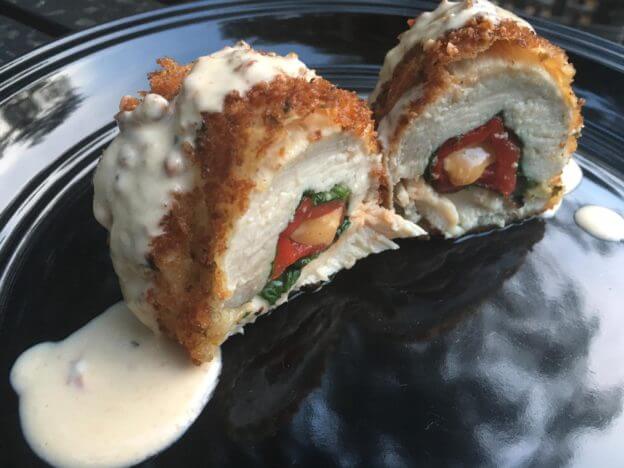
Chipotle Gouda Stuffed Chicken with Cream Sauce

Chipotle Gouda Stuffed Chicken

What’s that old saying about feeding a man for a lifetime if you teach him how to fish?  Well, in my case, give me a chicken and I’ll teach you how to stuff it….Give me a chicken with chipotle gouda cheese and you’ll be getting requests for it for a lifetime, LOL!  This is one of those recipes where I tested it out on my man, JP, and he put down his fork, threw back his head and uttered something along the lines of, “OOOOOOOOMYGODPARKERTHISISTHEBESTCHICKENEVER!!!”

In the last 8 years, I have fed this man many a chicken dish, so I promise you, this one’s a keeper!

Stuffed chicken sounds fancy and complicated, but this recipe is really easy– you just need to pay attention to your cook time to make sure you don’t dry out the chicken.  I think the best way to cook chicken like this is frying it on the stove top and then finishing it off in the oven for a few minutes.  Always, always test it first to make sure it’s cooked through.

I created this deliciousness for the Western Dairy Association, who works on behalf of dairy farm families in Colorado, Montana and Wyoming.  WDA is celebrating 80 years of helping dairy farm families tell their stories. Check out the Western Dairy Blog  to read about the families who have been dairying for over eight decades!  A whopping 97% of dairy farms in the US are family owned and operated, so it’s pretty cool that every dairy purchase supports those hard working families!  And, at about 25 cents a glass, few foods deliver milk’s powerhouse of nutrients in such an affordable and available way.

You can make this recipe with any cheese you like– sharp cheddar would be delish, swiss cheese would be scrumptious, but I wanted to really take the flavor to a new level with the hint of chipotle peppers. The subtle spiciness of the chipotle gouda doesn’t overpower the dish at all– it’s actually really balanced.  I also really dig the textures of this meal– the crunch of the panko breaded chicken and the smooth, velvety cheese sauce are guaranteed to impress.

And, I mean, just look at that creamy, melty cheese in the middle!  

Chipotle stuffed chicken  I prefer frying the rolled up cutlets first, but you can bake them as well— just keep them in an oven at 375 degrees for about 30 minutes.  If you do decide to fry them, make sure the oil is not too hot.  I keep it on medium heat, just hot enough to hear a sizzle, but not snapping, popping hot.  If the heat is cranked too high, you’ll end up with a burned outside and raw inside– no bueno!

I suggest serving a simple salad with these— they’re rich enough and loaded with enough veggies on the inside that you really don’t even need another side dish!

chipotle stuffed chicken

Chipotle Gouda Stuffed Chicken with Cream Sauce
Chicken breasts stuffed with chipotle gouda, roasted red peppers and spinach with a creamy, cheese sauce.
Write a review
Print
For the Chicken
  1. 4 chicken cutlets (or breasts pounded thin)
  2. 4 roasted red peppers drained
  3. handful of fresh spinach
  4. 4 slices of chipotle gouda (or chipotle cheddar) *not too thinly sliced!
  5. Italian seasoned panko or breadcrumbs
  6. flour
  7. egg wash
  8. canola oil
  9. toothpicks
For the sauce
  1. 1/2 cup chipotle gouda
  2. 1/2 cup full fat mayo
  3. 1/2 cup milk
  4. 1-2 Tb adobo sauce (the sauce that's in a can of chipotle peppers)
  5. kosher salt to taste
For the chicken
  1. Preheat oven to 375.
  2. Wash and dry the cutlets.
  3. Lay out the chicken flat and layer with spinach leaves, then roasted red pepper, then cheese. The peppers won't be a perfect fit on the chicken, so cut them in pieces to lay flat on top of the chicken.
  4. Roll up the cutlets and secure with toothpicks.
  5. Dredge rolled chicken in flour first, then egg wash, then panko
  6. Heat up about an inch of canola oil in a wide rimmed frying pan on medium heat.
  7. Using tongs, place rolled chicken in oil and fry on all sides until golden brown, about 7-10 minutes total.
  8. Drain on paper towels and put chicken on a baking sheet.
  9. Bake for 10-12 minutes until cooked through. Make sure to test chicken before you put it in oven, and then again after 10 minutes or so. If the cutlets are super thin, they'll cook faster.
For the sauce
  1. Combine cheese, mayo, milk and adobo sauce in a small saucepan until melted and combined. Season with kosher salt to taste.
  2. Pour sauce over chicken when ready to serve.
Notes
  1. If you prefer to bake the rolled chicken without frying, bread the roll ups, then bake at 375 for 25-30 minutes until cooked through.
What's on Parker's Plate? http://whatsonparkersplate.flywheelsites.com/
 Happy National Dairy Month!  For the perfect dairy delicious dessert, check out my mini no bake key lime cheesecakes.

*This recipe and post were created for the Western Dairy Association but all opinions are my own.

Like this post? Share it!
Share on FacebookTweet about this on TwitterPin on PinterestShare on Google+Email this to someone
smoked salmon deviled eggs

Smoked Salmon and Herb Deviled Eggs

smoked salmon deviled eggs

I’m a deviled egg fiend.  Like, so much so that no matter what time of day, what time of year, or where I am, if there are deviled eggs on the menu, I order them!  It’s sort of become a “thing” and now I research restaurants wherever I am traveling to scour their menus and devour their deviled eggs.  One of my favorites is the combo of deviled eggs mixed with bacon, bourbon marmalade and fresh green onions at Smoke Ring in Atlanta. Like, seriously? Bourbon AND Bacon AND deviled eggs?  But, nothing beats the sultry, savory deliciousness of smoked salmon with just the right amount of mayo, mustard and sour cream, folded into an egg white with tarragon and dill.  Want to take it to a whole new level?  Pair it with a crisp Chardonnay– my summer go-to is Edna Valley.  

Edna Valley Chardonnay

This is like springtime in a wine bottle!  The Edna Valley vineyard is nestled between LA and San Francisco, and is considered the jewel of California’s central coast.  Edna Valley Vineyard Chardonnay has bright aromas of lemon oil and white flower.  On the palate, there are delicate layers of white peach and apricot intertwining with brown sugar and spice.  

I love doing wine pairings when I’m entertaining, and this is the perfect opportunity to do so…the crisp, fruitiness of the Edna Valley balances the smokiness of the deviled egg while accentuating that velvety, creamy mouth feel.  And can we talk butter for a minute?  The Edna Valley has a buttery feel to it which also brings out the secret ingredient in these little devils….that’s right!  BUTTER.  It’s a little trick I learned from the Queen of Southern cooking– Virginia Willis.  

Smoked_Salmon_Deviled_Eggs

It’s really divine!  Side note, I also just tried Edna Valley’s Cabernet this week and I’m sold on that one too.  It’s a medium-bodied red wine with ripe, dark fruit flavors with hints of vanilla, leather, anise and cocoa powder.  I had it with a filet and it was perfect!

Taste summer right here with this recipe and check out some of the delish on Edna Valley’s site– with more great ideas for pairings.

*This is a sponsored post but all opinions are my own.

Smoked Salmon and Herb Deviled Eggs
A velvety deviled egg with savory smoked salmon and fresh herbs
Write a review
Print
Ingredients
  1. 8 eggs
  2. 2 oz smoked salmon
  3. 2 teaspoons dill (plus more for garnish)
  4. 2 teaspoons tarragon (plus more for garnish)
  5. 1/3 cup mayo
  6. 2 tsp dijon mustard
  7. 1/4 cup sour cream
  8. 1 Tb soft, salted butter
  9. salt and pepper to taste
Instructions
  1. Place eggs in a large saucepan. Cover with cool water to 1 inch above eggs; bring just to a rolling boil. Remove from heat; cover and let stand 15 minutes. Drain and rinse with cold running water until cool.
  2. Peel eggs; cut in half lengthwise. Place yolks in a medium bowl; mash with a fork until smooth. Add all ingredients and stir well. Spoon mixture into egg white halves (about 1 tablespoon in each half). Garnish with dill and tarragon sprigs, if desired.
Notes
  1. Pair with Edna Valley Chardonnay
Adapted from Edna Valley
What's on Parker's Plate? http://whatsonparkersplate.flywheelsites.com/
Like this post? Share it!
Share on FacebookTweet about this on TwitterPin on PinterestShare on Google+Email this to someone
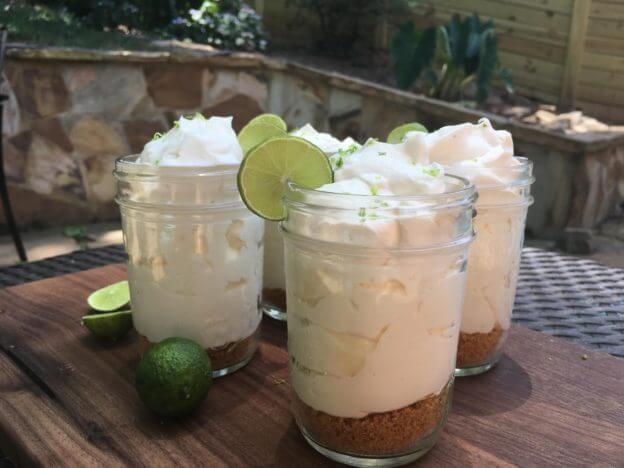
Key Lime No Bake Cheesecakes

Mini No Bake Key Lime Cheesecakes

Key Lime No Bake Cheesecakes

This spring, I’ve been obsessed with mason jars– small, large, super sized mason jars for everything you could imagine!  I use them for vases, glasses, candle holders, table top terrariums, a DIY ice cream bar and now, ladies and gentlemen, no bake cheesecake jars!  The first time I used mason jars for dessert, I was catering a high-end dinner party and my cake didn’t set up.  I was horrified.  It was delicious, but it had collapsed in the middle and looked like a hot (yummy) mess.  As I was standing at the counter, hoping no one came into the kitchen and discovered my catastrophe, I remembered about a box of mason jars I had in the back of my truck. I quickly layered the warm, gooey mess into the jars with ice cream.  Then, I whipped up a little caramel sauce, popped some whipped cream on top and called it GOURMET.  My guests never knew about my baking crisis and later raved about the “moist” cake, LOL! 

It made perfect sense to style my Mini No Bake Cheesecake in these little jars!  And, in honor of National Dairy Month and my partnership with the Western Dairy Association, I created what I consider the perfect summer dessert.  I’m not a fan of super sweet anything, and the same goes for my cheesecake.  Lately, no bake has been my go-to, because, well, it’s NO BAKE!  No fussy water baths and springform pans.  With the mason jars, you just layer in the graham cracker crust, top with the key lime cheesecake filling, some whipped cream and they can chill in the fridge till you’re ready to serve them.

Key Lime No Bake Cheesecake

Before we get to the delish, check out some of these awesome stats… The average glass of milk costs only 25 cents a glass– few foods deliver milk’s powerhouse of nutrients in such an affordable and available way. When you buy dairy products at your local grocery store or farmers market, you are supporting dairy families — 97% of the country’s dairy farms are family owned and operated.

The Western Dairy Association works on behalf of dairy farm families in Colorado, Montana and Wyoming, and they’re celebrating 80 years of helping dairy farm families tell their stories. Check out the Western Dairy Blog throughout the month to read about the families who have been dairying for over eight decades!

Colorado is a great place to be a dairy cow –  their cows are second in the nation in milk produced per cow – a sign that they are happy and healthy.

And huge shout out to Western Dairy Association farms:  Colorado dairy farm families produce over 3.4 billion pounds of wholesome, nutritious milk each year. Montana dairy farm families produce 288 million pounds of milk each year and Wyoming dairy farm families produce over 123 million pounds of milk each year.  That’s a whole lot of healthy and happy!

Ready to dive into “Dairy Delicious?”  I know you are….

Here are some other yummy cheesecake recipes you might want to check out too:

Guilt Free Lemon Cheesecake

Peanut Butter Oreo No Bake Cheesecake

Peanut Butter & Jelly No Bake Cheesecake (scroll down for recipe)

Pebbles No Bake Cheesecake

Lemon Cheesecake with Lemon Curd

Mini Nutella Cheesecakes

*This is a sponsored post by the Western Dairy Association, but all opinions are my own.

Mini No Bake Key Lime Cheesecakes
Serves 4
A refreshing mini key lime cheesecake in mason jars.
Write a review
Print
For the crust
  1. 2 Tb butter
  2. 1/2 cup graham cracker crumbs
  3. 1/2 tsp cinnamon
For the key lime filling
  1. 1 (8oz) package of full fat cream cheese
  2. 3/4 cup heavy cream whipped to soft peaks
  3. 1 tsp vanilla extract
  4. 1/2 cup granulated sugar
  5. 1/4 cup key lime juice
  6. zest of 2 key limes
For the whipped cream topping
  1. 3/4 cup heavy cream
  2. 3 tsp powdered sugar
  3. 1 tsp vanilla
  4. zest of one key lime
For the crust
  1. Melt butter and mix in graham cracker crumbs and cinnamon.
  2. Layer a couple spoonfuls at the bottom of each mason jar.
For the filling
  1. Bring cream cheese to room temperature and mix with sugar until smooth. Fold in heavy cream (whipped to soft peaks), vanilla, key lime juice and zest.
  2. Mix until smooth.
  3. Spoon on top of crust to nearly the top of each mini jar.
  4. Cover and keep in fridge for 3 hours or until firm.
For the whipped cream topping
  1. Whip heavy cream with powdered sugar and vanilla until soft peaks are formed.
  2. When ready to serve, put whipped cream on top and finish with a little zest and a slice of key lime for garnish.
What's on Parker's Plate? http://whatsonparkersplate.flywheelsites.com/

·


Like this post? Share it!
Share on FacebookTweet about this on TwitterPin on PinterestShare on Google+Email this to someone